Many mothers choose to make their own baby food rather than buy pre-made baby food.
There are several advantages to doing this, for example:
- You can help to develop your baby’s food tastes.
- You know exactly what you are feeding your baby.
- Your child will benefit from the most healthy baby food choices.
- You will save money.
Saving money on baby food is a pretty big deal!
Not only are you saving money by feeding your baby what you’re already eating yourself (rather than buying special food for the baby), but homemade baby food recipes cost much less than ready made baby food anyway.
For example, this video provides 10 homemade healthy baby food recipes for less than $2 apiece:
And I like this example which shows how much healthier homemade baby food recipes are, compared to store-bought baby food:
To illustrate the nutritional differences between homemade and storebought baby foods. Each 71 gram serving of Gerber 1st Foods Banana Purée contains 13 grams of sugar, 5 milligrams of sodium and less than 1 gram of fiber. But 71 grams of mashed-up banana contains only 8.7 grams of sugar (a teaspoon less), under 1 milligram of sodium, and 1.8 grams of fiber. And lest you think it’s just a brand problem, a 71 gram serving of Earth’s Best 1st Bananas —you know, the brand that’s supposed to be more virtuous than Gerber—contains 12 grams of sugar, 1 gram of fiber, and even more sodium (20 milligrams). Source
Making baby food isn’t as difficult or time-consuming as you might think — especially if you use our handy tips below!
10 Things To Remember When Making Baby Food Yourself:
#1 – Use organic fruits and vegetables.
Farms that grow organic fruits and vegetables don’t use fertilizers that contain nitrates which are very toxic to babies. (They aren’t good for adults either — but for babies they’re especially dangerous.)
Babies who ingest too many nitrates can develop a condition called methemoglobinemia, which is a type of anemia.
Also, some vegetables (like beets, broccoli, cabbage, carrots, celery, collard greens, lettuce, spinach, and turnips) naturally have nitrates in them and should only be fed to babies in very small amounts — 1 to 2 tablespoons per feeding.
#2 – Avoid solid foods for your baby’s first 6 months.
Keep in mind that most doctors these days say not to add solid foods to your baby’s diet any earlier than 4 months — and most recommend waiting until 6 months of age.
There are several reasons to delay feeding your baby solid foods. The biggest reason is your baby’s digestive system cannot handle solid foods before 6 months of age — contrary to those who claim that it’s okay to begin putting cereal in your baby’s bottle when he is a few weeks old.
Here’s a helpful baby food progression table, plus a handy baby food chart that shows which foods make the list of acceptable 6 month baby food and a 1-year-old baby food list.
#3 – Cook fruits & vegetables in water to soften them before pureeing.
It doesn’t matter if you choose to bake, steam, or boil before you puree baby food — just be sure to use a tiny amount of water for whichever method you choose.
That way, the food will be soft enough while still maintaining the key nutrients.
TIP: Keep the water you cooked them in to thin your puree to the right consistency.
#4 – Don’t add salt, sugar, margarine, butter, or spices to homemade baby food.
A baby’s digestive system is not ready for those until 1 year of age — at which point, it’s okay to begin slowly introducing those things.
Here are some do’s and don’t of making baby food healthy.
#5 – Avoid skins and seeds in fruits & vegetables.
Even though the peels and skin of fruits & vegetables contain valuable nutrients (and as adults we should eat them), they can cause digestive issues for babies.
So… to avoid giving baby an upset tummy, be sure to remove any skins or seeds from fruits before you cook and then puree baby food with them.
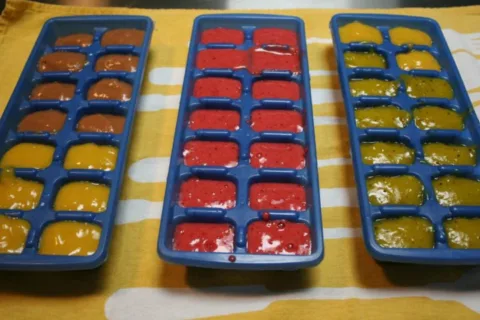
#6 – Freeze extra pureed homemade baby food in ice cube trays.
Once your homemade baby food is frozen, you can pop the cubes out and put them inside freezer bags — labeled with what they are and when you made them.
They’ll last about 3 months or so in the freezer.
TIP: Make sure to cover the ice trays with plastic wrap while the baby food is freezing!
#7 – Only thaw enough frozen baby food for one day at a time.
When you’re ready to thaw and reheat your homemade baby food, begin by placing it in the refrigerator to thaw slowly — not on your kitchen countertop!
It usually takes about 4 hours to thaw baby food that’s been stored in ice cube trays — but you can safely thaw baby food in the refrigerator overnight.
Once thawed, heat it in a saucepan on the stove — while stirring constantly and repeatedly checking the temperature.
TIP: Do not refreeze any leftover baby food that has already been cooked!
You should never refreeze a thawed product, that is correct. Refreezing thawed products may affect the taste and quality (and possibly very minutely, the nutritional value) of the product. You should ALWAYS cook a thawed product prior to re-freezing it. Cooking a thawed product will allow you to then re-freeze it for 1 cycle. Source
#8 – Slow cook all meats used for homemade baby food.
When preparing meats for homemade baby food recipes, it’s best to slow cook them first and then puree them to the right consistency.
You could use a crockpot — though some prefer to bake or steam the meats instead.
#9 – Carefully check the temperature of the food before feeding it to your baby.
The safest way to heat baby food is to:
- Put the food in a heat-safe dish.
- Sit the dish over a small pan of simmering water.
- Stir constantly to make sure that it heats evenly throughout.
It’s best not to use the microwave to thaw or warm up homemade baby food — simply because it’s so easy for there to be hot pockets. You could end up giving your baby food that is way too hot without even realizing it.
#10 – Don’t save leftover homemade baby food.
Don’t get in the habit of storing homemade baby food that is left over after feeding your baby.
For one, if you store baby food in the same container that you served baby from, the baby’s own saliva in the food will facilitate bacteria growth.
Even if you don’t dip baby’s spoon into the same container, the rule of thumb is not to store leftover baby food longer than 48 hours in the refrigerator.
If you keep the above 10 tips in mind when making your own homemade baby food, you can be certain that what you are feeding your baby is safe, healthy… and tasty!
Here are some healthy baby food recipes to start with.
I like to help people find unique ways to do things in order to save time & money — so I write about “outside the box” ideas that most wouldn’t think of. As a lifelong dog owner, I often share my best tips for living with and training dogs. I worked in Higher Ed over 10 years before switching gears to pursue activities that I’m truly passionate about. I’ve worked at a vet, in a photo lab, and at a zoo — to name a few. I enjoy the outdoors via bicycle, motorcycle, Jeep, or RV. You can always find me at the corner of Good News & Fun Times as publisher of The Fun Times Guide (32 fun & helpful websites).

