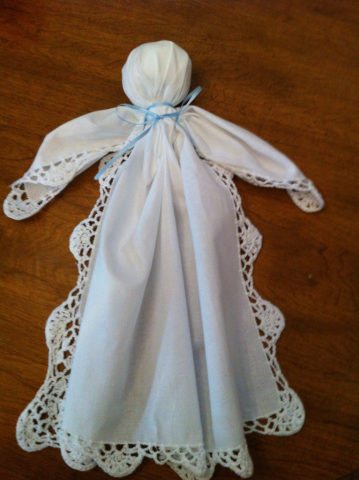
When I first saw a no-sew handkerchief doll at a local craft fair, I immediately thought it would make a precious gift for a new mom.
A soft doll like this can grow with the child and possibly become a comforting naptime friend or lovey — similar to these angel dear blankies that are often used as security blankets.
In fact, baby security toys like blankies and dolls are actually beneficial to a child’s development.
So, my wheels got to spinning, and I thought making handkerchief dolls would also be a great way to pass the time if you’re on bed rest during your pregnancy.
As a bonus, you could later sell your homemade handkerchief dolls at craft fairs, yard sales — or even online through Etsy or Ebay.
Whether you’re making them as gifts or you’re making them as a way to pass the time, you’ll definitely enjoy how quick and easy these no-sew handkerchief dolls are to make!
The Story Behind Church Dolls
These sweet little dolls are known by many different names:
- pew babies
- church dolls
- angel babies
- prayer dolls
- handkerchief dolls
- hanky dolls
- church babies
- pew dolls
- pioneer dolls
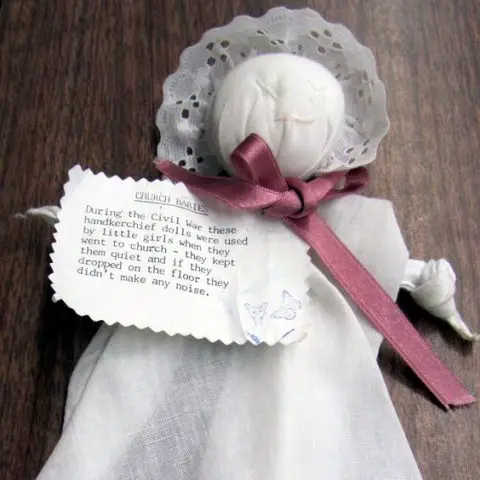
The simple cloth dolls were used in the 1800s to keep little girls quiet in church.
And, because they were made of cloth, they made no sound when they were dropped on the floor!
During the Civil War (and at other times when toy-making supplies were scarce), dolls were made from handkerchiefs for little girls. These “handkerchief dolls” were carried to church and did not make noise if they were dropped. They were also known as one of the “Sunday toys” that children were allowed to play with only on Sundays. Some mothers would put sugar cubes or candy in the head of the handkerchief doll for a youngster to suck on to keep the child quiet during the long church service.
~Historical Folk Toys
Ready to make a church doll from a man’s handkerchief yourself?…
DIY Handkerchief Doll Instructions
Handkerchief church dolls are made similarly to linen napkin dolls.
You can make a no-sew handkerchief doll using these 8 simple steps:
 Unfold the handkerchief, so you can see all 4 corners at once.
- Create a loose knot in each of the top 2 corners of the handkerchief to form sleeves.
- Holding both of those knots — one in each hand — create the head by using your thumbs to create a poofy space in the handkerchief between the arms.
- Tuck some polyester fiberfill, tissue paper, or a small piece of leftover cloth into the head area so it will hold its shape.
- Wrap a rubberband several times around the neck of the doll to hold the stuffing within the head.
- Lightly tug on the arm knots to bring the edges of her “dress” out — like a sweater would drape open over the stomach area.
- Move the arm knots closer to the head in order to bring the folds of the dress closer to the center of the doll’s body.
- Tie a thin ribbon — in a complementary color — around the doll’s neck to hide the rubberband. You can leave the ends of the ribbon long and flowing or cut them short, closer to the doll’s neck.
Optional:
- If you want to create the effect of a bonnet on the doll’s head, then add a small piece of ribbon around the forehead area. You can glue it on, or sew it on.
- You could also add a piece of lace along the dress bottom — the lace can be glued or sewn onto the handkerchief.
This video shows you how to do each of the above steps:
Gift Ideas For Handkerchief Baby Dolls
Church dolls make a lovely decoration for a little girl’s room!
DIY handkerchief dolls also make great baby shower gifts. They’re so unique, they’re sure to charm the guests who attend the baby shower.
A handkerchief doll will be a cherished gift for mother and daughter to enjoy together.
You might want to type up the history of church dolls or the handkerchief doll poem (below) and attach it to your handmade doll — IF the doll will be used for decoration purposes only.
If the doll will be played with, then you’ll want to make sure that the doll and your message are two separate items — so the message can be saved by the person you’re gifting the doll to.
A Simple Handkerchief Doll Poem
This sweet poem would be a nice addition for each handkerchief doll you make:
This poem is perfect for handkerchief church dolls, too:
For what it’s worth, I also like the lyrics to Anne Wilson’s song, “Sunday Sermons” which starts with this verse:
Seven years old, third row pew
John 3:16, something changed in me
Red letters coming off the page
Flooding my heart with amazing grace
I knew then I believed
And those roots run deep
Oh I’ve been through some faith shaking hard times – yeah
But nothing’s gonna make me forget…
Every one of those Sunday sermons
Every time that choir would sing
I could hear my Savior calling, telling me how much He loves me
No matter what the world throws at me
I know His word is true
It all started with heart stirring, spirit moving Sunday Sermons
Devil gonna try and take me out of that church
But you can’t take the church out of me
~Anne Wilson, Sunday Sermons
Did You Know?…
As time passed, larger cloth dolls were made including:
- The pioneer doll – which had arms and legs made from material, as well as the body and head
- The pillowcase doll – a larger version of the handkerchief doll
These types of rag dolls eventually became mass produced in the form of Raggedy Ann and Andy!
Other Handkerchief Doll Tutorials
- How To Make A Hanky Doll / Pew Baby
- Plantation Doll (aka Church Doll) Tutorial
- Detailed Handkerchief Doll Tutorial
- How To Make A No-Sew Rag Doll
I like to help people find unique ways to do things in order to save time & money — so I write about “outside the box” ideas that most wouldn’t think of. As a lifelong dog owner, I often share my best tips for living with and training dogs. I worked in Higher Ed over 10 years before switching gears to pursue activities that I’m truly passionate about. I’ve worked at a vet, in a photo lab, and at a zoo — to name a few. I enjoy the outdoors via bicycle, motorcycle, Jeep, or RV. You can always find me at the corner of Good News & Fun Times as publisher of The Fun Times Guide (32 fun & helpful websites).


